


Standard Manuscript Format for Writers
Last month, I shared my tips for How to Use Scrivener (Without Anxiety). But as I mentioned in that post, the industry standard for publishing is Microsoft Word. So if you just can’t get on board with Scrivener, I’m back with some tips for some of the other common word-processing packages writers use to write their book-length work.
No matter which software package you choose to write in, you’ll need to export the final product to Microsoft Word before you send it to agents or editors. And you’ll need to make sure you’re using Standard Manuscript Format, which is:
- 12 pt serif font such as Times New Roman or Garamond, left-aligned (not justified, please)
- Doublespaced
- First line indent (either .25” or .5” is fine)
- 1” margins on a standard 8.5”x11” page (please do not use a 6”x9” page even though that may be the book’s eventual format!)
- A header with your last name, the book’s title in ALL CAPS, and the page number
- A title page with your contact details in the upper left corner, the genre and word count in the upper right corner, and the book’s title centered in the middle of the page
If you’re not already familiar with using the formatting features in Word, I know it can be a bit tricky. That’s why I’ve made a video on Standard Manuscript Format in Word and Scrivener to demystify the process a bit.
Note: Formatting your manuscript is not the time to show your creativity–let your story do that! The reason Standard Manuscript Format exists is to make things easy for agents and editors to read across multiple devices. So stick with the guidelines, even if it feels boring.
Sending Excerpts Via Email
No matter which tool you use to write your pages, if you send excerpts in-line in an email, be sure to send a test email first to make sure the formatting looks good. QueryManager does a decent job of formatting the sample pages you paste into its form, but I’ve seen a Standard Manuscript Format page in both Word and Scrivener translate into a teeny-tiny font when pasted into an email. So play around with emailing the pages to yourself until it looks good. You want to make it easy for an agent or editor to read your sample pages!
Applying Standard Manuscript Format, By Tool
There’s nothing more frustrating than formatting gremlins making themselves at home in your manuscript! That’s why I recommend using styles rather than relying on remembering to format each individual chapter in Standard Manuscript Format. While it takes a little while to get used to Styles if you haven’t used them before, setting them up now will save you headaches later, I promise. No matter which of the common word-processing tools you’re using, I’ve included a primer on how to set your files up so they follow Standard Manuscript Format.
Pages
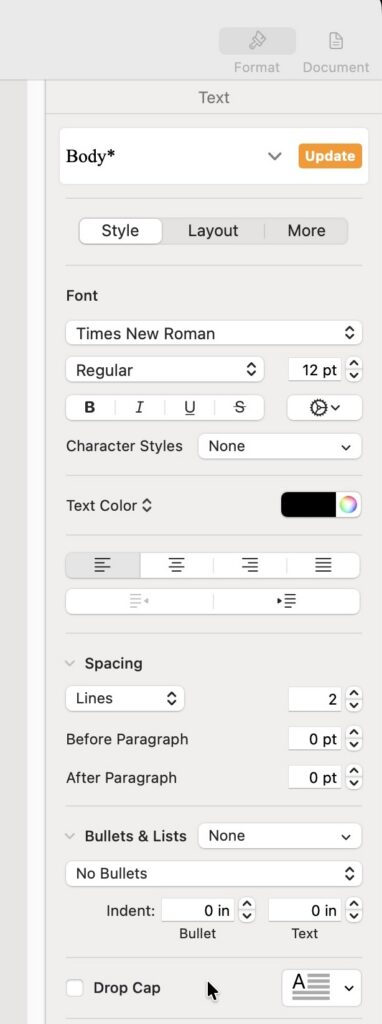
Apple includes its Microsoft competitor, Pages, on most of its devices. It has a handy Format window you can open on the right-hand side of the Pages window to help you set your document up in Standard Manuscript Format. If you don’t see the Format window when you open pages, just click the paintbrush icon at the top right of your Pages window.
Before you begin writing, change the default Body text to Standard Manuscript Format as shown in the screenshot I’ve provided (You’ll need to go to Layout in the Format window to add the first line indent). Once you’ve done that, you’ll see an orange Update button next to the word Body. Click it to save your changes and Pages will automatically apply Standard Manuscript Format to all your body text.
If you’ve already got a project in Pages and need to reformat it, you may notice that doing the above doesn’t apply the formatting to your existing text. That’s probably because it was not tagged Body text as you wrote.
To fix this, go to Edit | Select All, then click Body in the Format window to apply Standard Manuscript Format to your text. If you’ve centered your chapter headings (which is not required, but is common!), you may have to reformat those, or create a new style for Chapter Heading that includes centered text.
When you’re ready to send pages to your agent, editor, critique partner, or book coach, you can use File | Export to | Word to create a .doc or .docx formatted document for sharing.
Although the export feature has improved quite a bit over the years, there is sometimes still a little funkiness to formatting, especially if you have a novel in verse or other unusual formatting. I definitely recommend having someone who has Microsoft Word take a quick look at your output before you start sending queries just in case.
Google Docs
Who doesn’t like a free tool? The Google suite of products offers all the power of the Microsoft suite but at an accessible price (free). Like Pages and Scrivener, you can export a file from Google Docs to Word format.
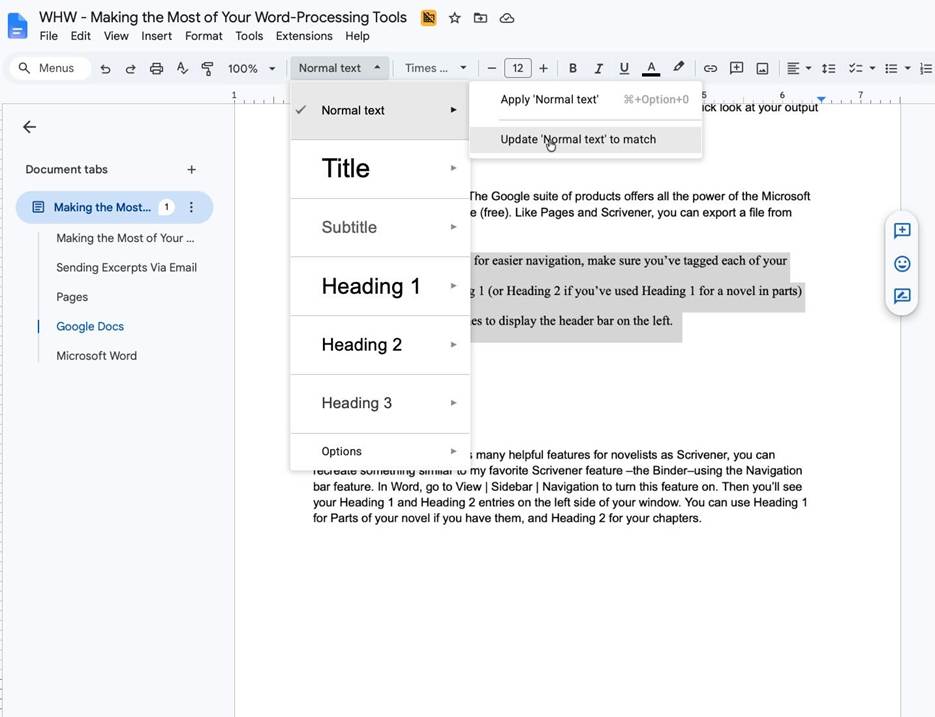
To show your chapters for easier navigation, make sure you’ve tagged each of your chapter headings with Heading 1 (or Heading 2 if you’ve used Heading 1 for a novel in parts) and click Show Tabs & Outlines to display the header bar on the left.
Microsoft Word
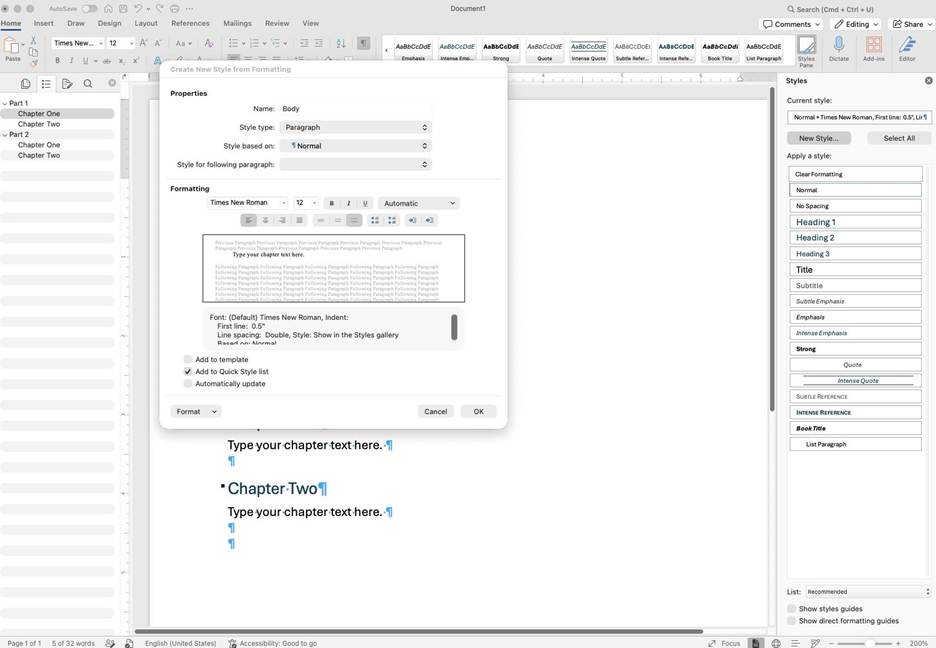
Although I don’t think it has as many helpful features for novelists as Scrivener, you can recreate something similar to my favorite Scrivener feature –the Binder–using the Navigation bar feature. In Word, go to View | Sidebar | Navigation to turn this feature on. Then you’ll see your Heading 1 and Heading 2 entries on the left side of your window. You can use Heading 1 for Parts of your novel if you have them, and Heading 2 for your chapters.
Just like in Pages and Google Docs, you’ll need to set up Standard Manuscript Format. Turn on the Styles Pane by clicking the button by that name from the menu bar. Then click New Style to add one called Body that uses 12 pt Times New Roman Font, double-spaced, with a first line indent of .5”. Click OK and make sure all your body text is tagged Body to apply the correct formatting.
Note: If your menu bar looks different than mine because I’m on a Mac, just go to the Help system and type in Styles Pane to find what you’re looking for.
Scrivener
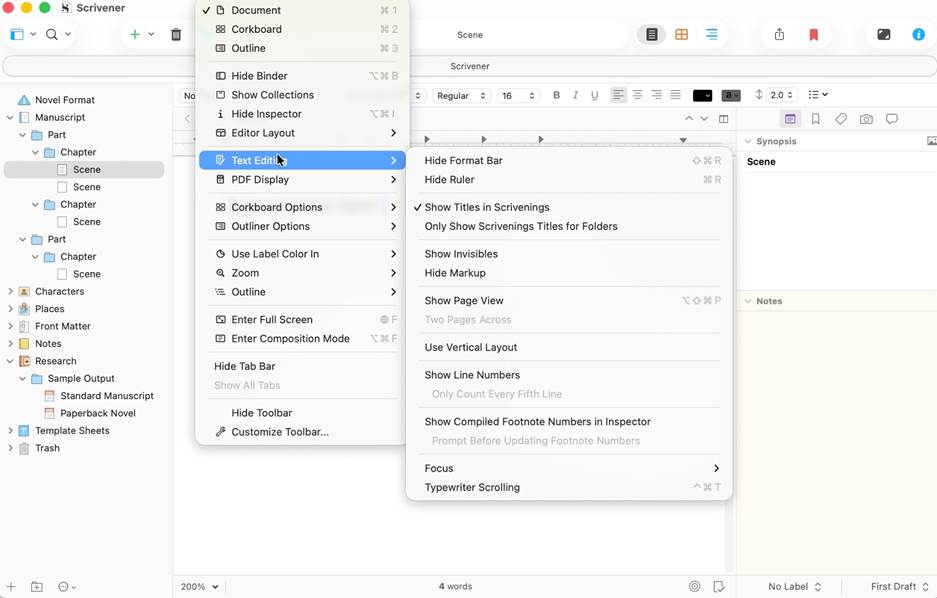
Because Scrivener was created specifically for writers, Scrivener’s standard format already uses Times New Roman 12 point font with double-spacing as its default. I do recommend turning on a few options in the View | Text Editor window: Show Ruler, Show Titles in Scrivenings, and Show Invisibles (so you can catch those extra paragraph marks and spaces as you type).
The Most Important Rule: Follow Submission Guidelines
No matter which tool you choose to write your novel, the most important thing to remember is to follow the submission guidelines when sending to agents, editors, contests, or critiques. Showing the recipient that you know what Standard Manuscript Format is and are willing to follow the rules makes the right kind of first impression. Hopefully this post has provided some helpful tips to get you started on formatting your manuscript correctly.





5 Comments.
Hi. Thanks for the guidelines. For a fiction MS, isn’t the first paragraph of every scene supposed to be flush with the margin, and subsequent paragraphs indented? That’s what other sources on format say, but you say the opposite. Thanks.
Published books typically do left align the first line of a chapter. So it’s absolutely fine to format your manuscript that way, but it’s also not required.
I am still trying to understand why everybody online seems to want double spaced, when all the publishing houses I am working with want the document to be spaced at 1.15. And why aligned to the left and not justified, when it has to look justified?
16 books and 6 publishing houses later, nobody had a gripe with this, nobody wanted it how I find mentioned online (you are not the only one with double spaced) – by contrary, I followed their instructions. I think only vanity presses want double spaced, to take more paper and therefore to have a reason to heighten the price…
Marina, this post describes standard manuscript format for sending to agents or editors before a book is published. The guidelines you specify are absolutely right for a published book! And you’re right to follow the submission guidelines even if they differ from what I recommend here.
Thank you for all these awesome tips, Julie!